 The biscobourse is finished. Do you want to see how it is done?
First you make the bottom and two tops. I got this chart and the idea from Les Chroniques des Frimousse here. You need to scroll down.
Next iron on stiffener to the reverse of each piece - keep it inside the backstitch outline.
Cut lining of your choice and slip stitch it to the reverse of each stitched piece - again keep inside the back stitch outline. You will end up with three separate pieces "finished".
Next whip stitch the three pieces together (just like a biscornu) so you get something like this.
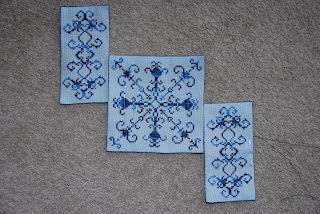
Now following carefully each of the rectangular pieces get whipped together (just like a biscornu!!) This photo shows only the two remaining "sides" to whip together.
Attach a ribbon or a fastener of some sort in the middle to close up the 'bourse' and voila! Here is the biscobourse. I think they would make a lovely gift with maybe a voucher hidden inside???


13 comments:
How pretty!! I love that you gave a quick tutorial on it. You did a great job finishing it. What a fun finish!
Lovely, Margaret. I must try my hands at making one for myself.
Hugs,
Margaret - that is so pretty and your photo tutorial in great - thanks!
Very creative !! It's pretty !! Thanks for a great tutorial ! Goes into my 'collection' of WIP :)
It's beautiful, well done!
Margaret,that is a lovely biscornu. I'm onto my 6th of the sealed in ones....I can see myself making a few of these, too! Your instructions are very clear and easy to follow...thank you for sharing.
How cool is that! Thanks for sharing the instructions - I can't wait to try it out! Your Biscoboure turned out lovely!!!
Margaret that is lovely! I too found this website a couple of weeks ago and I spent hours looking at all the great ideas that were on there, I have downloaded quite a few patterns, I found the website so inspirational!
I am glad your arm is a little better, however I am nervous because I think I might have to have the same operation as you, I am not sure yet because I have to go for a scan, but the thought of not being able to stitch is quite scary!
That looks wonderful, not seen one of these before
a really great idea thanks for sharing.. it looks incredible you could put expensive chocs inside or another small stitched item inside.. their are hundreds of possiblities.. well done..
You do such a wonderful job with stitching. I still love the bag you sent me in the quaker exchange. This biscobourse is beautiful!
Wow, this looks really interesting. What a great finishing idea. Thanks for sharing.
Looks nice! What do you put inside?
Post a Comment